Presets are a central part of FX Synergy, and are used to pre-configure a number settings. Presets are assigned to each account, and are primarily used for two things:
- Define which symbols and values are available for 1-click execution.
- Apply trailing stop and/or partial close to new and existing orders.
The concept of a preset is very simple: Pre-define as much as you possibly can, so you can open and manage your trades by doing as little as possible. By pre-defining your most commonly used settings and values you will be saving a huge amount of time.
To manage presets, go to Settings Presets.

The top view shows all the Presets, and the bottom view shows all the exceptions for the selected Preset. The small arrow on the left denotes which preset is currently selected. By default, all settings apply to all symbols in the preset, unless an exception has been added which overrides the default settings for that symbol. This allows you to fine-tune the settings for each individual symbol.

- Name: Give the preset a name. This is your own reference.
- Symbols: The symbols to display for 1-click execution. See Symbols below for more details.
- SL: The list of stop loss values in pips, separated by commas. The first value is the default value.
- TP: The list of take profit values in pips, separated by commas. The first value is the default value.
- Risk: The list of risk percentage values, separated by commas. The first value is the default value.
- Lot: The list of lotsize values, separated by commas. The first value is the default value.
- Select: Denotes whether to pre-select the default Risk or Lot value.
- Trail: Optional trailing stop levels. See Trailing Stop below for more details.
- Partial: Optional partial close levels. See Partial Close below for more details.
- Stealth: Denotes if Stealth Mode is enabled by default. When enabled, the S on the bottom right of the 1-click execution symbol will be checked by default.
- Ex: The number of exceptions. See Creating an Exception below for more details.
To clone a preset, click the curly arrow button on the far right. This a great way to create a new preset based on an exising one.
To delete a preset, click the X on the far right. Please note that you can’t delete a preset when it’s assigned to an account or account group.
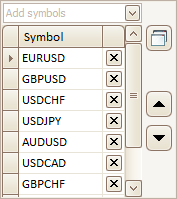
- Add: To add a new symbol, click Add Symbols just above the symbol list. Then select the symbol(s) you want to add and click OK.
- Remove: To remove a symbol, click the X next to the symbol.
- Re-order: To change the order in which a symbol is shown on the main screen, simply click on the symbol name to select it. The small arrow on the left denotes which symbol is currently selected. Then use the Up and Down buttons on the right to move the symbol up or down on the list.
If you want to add a symbol that is not listed, please see Symbols on how to add custom symbols.
If you are trading a lot of symbols, you may want to group the symbols for easier access. Please see Symbol Groups.
To add a new trailing stop level, click in the top row and fill in the details. When you are done, click somewhere below the top row to add it to the list.
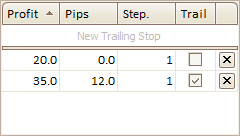
- Profit: How many pips the order should be in profit before moving the stop loss.
- Pips: How many pips to move the stop loss. When Trail is checked, the stop is moved against the market price. When Trail is unchecked, the stop is moved against the entry price.
- Step.: Stepping. Select the number of pips between each move. The default is 1.
- Trail: When checked, the stop will be trailed continuously. When unchecked, the stop will be moved only once.
To delete a level, click the X next to the level.
If at any time you want to open an order without applying the trailing stop levels, simply uncheck the P on the bottom right of the 1-click execution symbol before clicking Buy or Sell.
Please see Trailing Stop Examples for inspiration on how to best use this feature.
To add a new partial close level, click in the top row and fill in the details. When you are done, click somewhere below the top row to add it to the list.
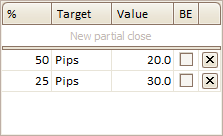
- %: The percentage of the lotsize you want close. Please note that the percentage applies to whatever lotsize remains at each level.
- Target: Cannot be changed. Reserved for future updates.
- Value: How many pips the order should be in profit before doing the partial close.
- BE: Break-Even. Moves the SL to the true Break-Even price after partially closing the order. Please note that Break-Even in this case is not the entry price.
To delete a level, click the X next to the level.
If at any time you want to open an order without the partial close levels, simply uncheck the P on the bottom right of the 1-click execution symbol before clicking Buy or Sell.
Please see Partial Close Examples for inspiration on how to best use this feature.
Select the preset you want to add an exception to, by clicking the selector on the left. The small arrow denotes which preset is currently selected. The bottom view shows all the exceptions in the selected Preset.
To add a new exception, click in the top row and fill in the details. When you are done, click somewhere below the top row to add it to the list.

- Symbol: Denotes which symbol the exceptions applies to.
- Everything else is just like the preset, except it only applies to the selected symbol.
Once an exception has been added, the symbol cannot be changed.
To clone an exception, click the curly arrow button on the far right. This a great way to create a new exception based on an exising one.
To delete an exception, click the X on the far right.
All presets can be changed at any time, simply click the setting or value you want to change and adjust it.
After creating a new preset, go to Settings Accounts and use the Preset column to assign the new preset to the account(s) you want to use it with.